DIY: How To Install A Wood Burning Stove
July 19, 2023
Step 1: Install the non-combustible floor pad and non-combustible wall protection
Planning is the first step when installing a wood burning stove. You will first need to look at the installation instructions of the wood stove to determine the proper floor protection. There are two different types of floor protection, type 1 ember protection and type 2 thermal protection. Most wood stoves require a type 2 floor protection if the stove is going to be placed on a combustible floor.
Once you have selected the location for the stove, you can then determine the size of the floor protection to meet the UL 1482 requirement. UL 1482 requires 16" of floor protection extending in front of the stove and 8" beyond each side of the stove. The stove manufacturer will provide instruction on the floor protection and thickness of material needed. In most cases a hearth pad or stove board is an adequate floor protection.
The stove manufacturer installation instructions will lay out the proper clearance from each side of the stove to the combustible wall. Wall protection is not required if you are outside the clearances. If you would like to get the stove closer to a wall, you can install a hearth pad. The hearth pad wall protection will come with 1" spacers to stand the pad off the wall, providing a ventilated space between the hearth pad and the wall. For example, a 1/2" non-combustible hearth pad with a 1" ventilated air space on all sides can provide a clearance reduction of up to 66%.
Step 2: Cut a hole in the ceiling for venting the stove accordingly to the size of your stovepipe
Once the stove is in place the next step is to cut the hole in the ceiling for the support box. When you are venting a wood stove through a ceiling, you will need to transition from stovepipe to a Class A insulated chimney pipe before the ceiling. You can use a plumb bob or a laser level to line up the center point of the exhaust collar to the ceiling. The size of the hole cut in the ceiling is based on the installation instruction of the chimney pipe.
Step 3: Continue to cut the same size hole until you reach the roof
In some cases, the chimney pipe will have to pass through multiple levels of the home before it penetrates the roof deck. You can continue to use the laser level or a plumb bob to line up the holes to allow for the proper clearance for the chimney pipe.
Step 4: Remove any insulation so you are able to see straight through
When you are making the cuts through the floors and ceilings, you need to make sure to pull back any insulation so that it does not come in contact with the chimney pipe. Insulation is able to touch the sides of the support box, firestop and attic shield but it must not touch the chimney pipe.
Step 5: Install your Chimney Support Kit if you are using one, both on the roof and in the room with the stove

At the first ceiling, you will need to install a ceiling support box to carry the weight of the heavy pipe. Truss spanners can be installed between the ceiling joist to frame around the ceiling support box. The ceiling support box will come with some brackets that you are able to attach to the ceiling joist and the support box to hold it in place. In most cases, the ceiling support box must extend below the ceiling at least 3" for proper clearance for the stove pipe. The chimney pipe installation manual will list how far the ceiling support box must extend below the ceiling.
If the chimney pipe needs to pass through another level of the home, you will need a firestop joist shield at each level. The firestop joist shield will ensure the chimney pipe has the correct clearance as it passes through the floor joist. If the chimney pipe is passing through an attic, you will need to install an attic insulation shield to prevent anything from coming in contact with the pipe in the attic space. If you do not use an attic insulation shield you will need to frame a chase around the chimney pipe in the attic to prevent anything coming in contact with the chimney pipe.
Step 6: Install Flashing on the roof
The roof flashing will waterproof the chimney pipe as it passes through the roof. You can use a laser level or a plumb bob to line up the hole that needs to be cut in the roof. Locate the center point of the hole and cut the hole in the roof with a sawzall. For pitched roofs, you will need to cut an oval shaped hole to maintain the proper clearance for the chimney pipes. For a traditional shingle roof, you will have to get a long metal cutting blade for a sawzall and cut the nails from under the shingles on the top half of the hole cut in the roof. That will allow you to slide the flashing under the shingles on the top half. Before you tuck the flashing under the shingles, you will need to apply outdoor waterproof silicone to the underside of the flashing. You can then apply a bead of silicone around the perimeter of the flashing once it is in place.
Step 7: Start building your chimney, starting on the roof in the flashing

Once everything is in place, you can start assembling the chimney pipe sections. Rock-Vent Class A chimney pipe requires 3 screws to connect multiple sections of the chimney pipe together. You will need to connect the universal male adapter to the first section of the chimney pipe. The male end of the universal adapter will extend through the ceiling support box so you are able to connect the single or double wall stove pipe to the chimney pipe. If the chimney pipe is really long or is going through multiple levels of the home, it may be best to start at the ceiling support box, work your way up and finish the installation though the roof flashing. It is important to stabilize the chimney pipe above the ceiling support box with wall standoffs for long runs of chimney pipe. You will need to install a wall standoff every 8 ft. of vertical chimney pipe above the ceiling support box.
The chimney pipe must be a minimum of 3 ft. above the roof and also must be 2 ft. higher than anything 10 ft. away. The chimney height above the roof will be dictated by the pitch of the roof and the lateral distance from where the chimney pipe is going to penetrate the roof in relation to the peak. If the chimney pipe is coming through the peak of the roof, it will need to be a minimum 3 ft. above the roof if there is no structure within 10 ft. away. If the pipe is going to penetrate the roof on the low side by the eave, you will need to have the pipe extend higher above the roof. For example, If you have a 4/12 pitch roof, and the lateral distance from the roof penetration to the peak of the roof is greater than 10 ft., the pipe must extend 64 in. above the roof.
To calculate, multiply the roof pitch by the lateral distance from the peak of the roof. 4/12 pitch, 10 ft. lateral distance to the peak is 4 x 10 = 40. The top 40 in. of pipe above the roof will be a 10 ft. horizontal distance away from the slope of the roof. The pipe needs to also be 2 ft. higher than that point. So another 24 in.would make the total height of the chimney above the roof to be 64 in. A roof brace kit will be required to stabilize the pipe if the chimney pipe is 5 ft. or higher above the roof line. The roof brace kit is a band that has adjustable poles which anchor to the roof deck to stabilize the pipe.
Step 8: Install the storm collar and rain cap
The last step above the roof will be installing the storm collar and the chimney rain cap. The storm collar is what wraps around the pipe and sits over the flashing to seal off where the pipe comes through the top of the roof flashing. Most storm collars have a hose clamp mechanism to ensure the storm collar is tight around the pipe. Other storm collars have a tab that you bend around to lock the storm collar on. Once the storm collar is in place, you will need to put a bead of high temp silicone around the pipe and the storm collar to ensure the storm collar is water tight. Lastly, place the rain cap on the top of the pipe. The rain cap will be clamped around the outside of the chimney pipe.
Step: 9: Install The Stove Pipe

Now that the chimney pipe is installed, the next step is to connect the chimney pipe to the stove using a single wall or double wall black stove pipe. Your choice on which to use is going to be based on the clearance the stove pipe will have to combustible material. Single wall stove pipe requires an 18 in. clearance from any combustible material. Double wall stove pipe requires a 6 in. clearance. If you used a heat shield to get the stove closer to a wall, a double wall stove pipe would likely be required. If the stove is far away from a wall, then you could use a single wall pipe. Single and double wall pipes have similar installations. The male pipe ends of the stove pipe should always point down or towards the stove. Telescoping stove pipes make the installation of the stove pipe a breeze and do not require any cutting. In some cases the wood stove will not be sitting directly under the ceiling support box. In this event, you will need offsetting elbows to shift the pipe to the chimney support box.
Step 10: Install Damper
If you are installing an older stove without any type of draft control, it would be wise to install a damper on the stove pipe. The damper will regulate the draft and extend the burn time of the wood. A single wall damper installs in the stove pipe by drilling two holes in the pipe. Then you place the damper flap inside the pipe and run the damper rod through the holes on the pipe and the damper flap to lock it in place. A double wall stove pipe damper will come pre-assembled and is installed as a section of stove pipe. If you have a newer EPA rated stove, a damper is not needed since most newer stoves have a damper control built in.
Step 11: Light a test fire
Once everything is hooked up you can light a test fire. If this is a new wood stove, you will need to make sure to properly cure the fire bricks and the paint by having 3 to 4 small fires. Light a small fire and let it die out, then repeat 2 to 3 more times. The subtle heat will cure the bricks and paint. After the small fires, it will be okay to burn a hot fire. You can light a good fire right away if you have an older stove. If everything is working properly, there will not be any smoke rolling out of the front of the wood stove when you open the door.
Considerations Before Installing A Wood Burning Stove
Type of Stove:
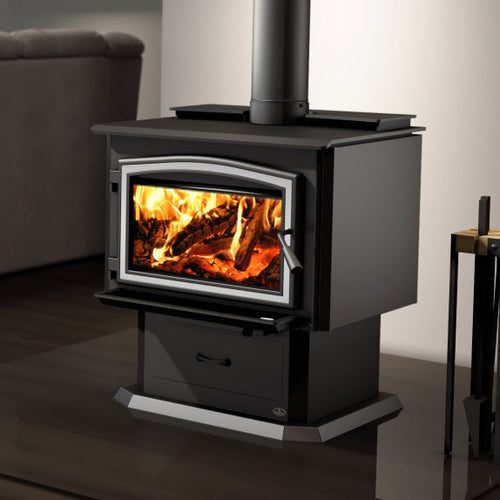
The best type of stove to install is a new EPA rated stove. The modern stoves are made to have long burn times to maximize the heating value of the wood. The size of the stove is a very important factor when choosing which stove to buy. A large stove installation in a small home will likely heat yourself out of the room and create a lot of creosote from burning smaller fires. Likewise, a small stove installation in a large home will probably not help reduce heating costs.The EPA rated stoves are meant to be fully loaded and choked down once the firebox gets up to temperature to provide a long hot burn. Review the manufacturers suggested heating area and choose the stove based on the size of the room not the home.
The Osburn wood burning stoves are a great stove line to choose from. The Osburn wood stoves use secondary air burn technology which make for a long and efficient burn. Secondary air stoves do not burn as clean as catalytic stoves. However, they are much easier to run. The single air control allows for easy use. They offer all sizes of fireboxes as well as a variety of designs ranging from contemporary stoves to more traditional wood burning stoves.The Osburn stove line offers customizable features to tailor the stove to any room design.
Building Codes & Regulations
It is important to follow all local and national building codes when installing a wood burning stove in your home. The chimney pipe used to pass through a ceiling and roof should always be listed to UL 103 HT, unless stated otherwise by wood stoves manufacturers installation instructions. Shortcuts should never be taken when installing a wood burning stove. Clearances for the stove and chimney pipe should always be maintained and if possible extended. The wood stoves manufacturers installation instructions will clearly lay out the proper clearance for every possible venting configuration.
Should You Hire A Professional Installer?
In most cases, installing a wood stove can be very simple but some cases can be very difficult. Most people hire an installer because they are not physically capable or are uncomfortable with getting on the roof. The tools required are common power tools which are found in most DIY tool boxes which make the job simple. But keep in mind you are putting a controlled fire in your home so if you are unsure about anything please contact a certified installer.
Related Articles

DIY Center
(AKA ‘The Rockford Files’)
From video tutorials to product walkthroughs, we have a variety of DIY resources just for you! Click the button below to view our entire library.
Our 316Ti flexible chimney liner and chimney liner components have passed the rigorous testing at the Underwriters Laboratories with best in class status and are UL Listed. So if you are looking for UL listed chimney liner sold directly to homeowners, then look no further than Rockford Chimney